How to DIY Better Beach Chairs
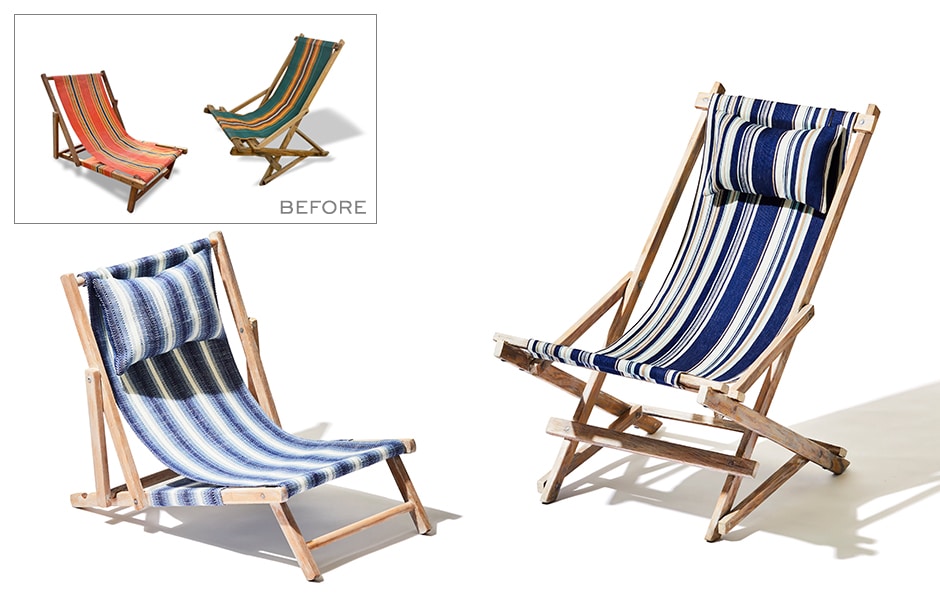
Our latest issue of Reveal has a project to make your beach days (or backyard hangs) even better: updated folding chairs! These beauties look store-bought, but you can DIY your own in a just a few hours, leaving you plenty of time for lounging. So grab your old chairs, pick a fresh fabric, and round up a couple other items to get a new-to-you summer seat in no time.
Here’s a full list of what you’ll need and a step-by-step DIY tutorial to help with the transformation.
What you need
- Old folding chair
- Needle nose pliers
- Orbital sander
- Sanding discs (#80–#120)
- Paintbrush
- Pre-stain wood conditioner
- Pickling stain (We used Minwax)
- Water-based polycrylic
- Outdoor fabric (Estimate based on the amount of old fabric on your current chair)
- Sewing machine
- Thread that matches your fabric
- Pins
- Fabric scissors
- Heavy duty stapler
- 1/2-inch staples
- Iron and ironing board
- Fiberfill (pillow stuffing)
Instructions
1. Carefully remove the fabric from your chair. If it’s attached using staples, use needle nose pliers to work the staples loose. Save the pieces of fabric as dimension guides for your new fabric.
2. Sand the wooden structure. Start with a coarse #80 sandpaper and work your way up to a fine #120 sandpaper. We used an orbital sander as much as possible and then did detail work by hand. Be sure to move the structure into different positions to make sure you sand as much surface as possible.
3. Brush on a pre-stain wood conditioner to help promote an even finish. Let dry, then lightly sand again.
4. Brush on pickling stain. Apply to one side and section of wood at a time and gently wipe it off while it’s still wet, working with the grain. If the wood isn’t quite white enough after one coat, repeat the process until you reach your desired tone. Move the structure into different positions to ensure you stain all areas.
5. Brush on a water-based polycrylic to seal the chair. Let dry.
6. Lay the seat fabric you removed from the chair onto your new outdoor fabric to use as a pattern sizing guide. Lightly mark your new fabric with the correct dimensions and use fabric scissors to cut down to size. If your new fabric will need to be hemmed along the edges, leave about 1/2 inch to 5/8 inches for folding over and hemming.
7. Zig-zag stitch along all raw edges of the cut pieces. Press and pin the hems, then stitch using a straight stitch.
8. Using a heavy-duty stapler and 1/2-inch staples, staple one end of the fabric to the chair frame where it was previously attached. Staple the other end of the fabric to the crossbar on the opposite end of the frame. Use the same method if your chair has a second piece of fabric.
9. Make the pillow straps. Cut a piece of fabric 11/2 inches by 24 inches. Lay the strip on your ironing board face-down. Fold the long edges on each side to the center and press them. Fold the strip in half again, then press and pin it. Straight stitch down the center of the strap, then cut it in half vertically so you have two 12-inch lengths.
10. Make the pillow. Measure the width of your chair sling and cut two rectangles of fabric, the width of your sling by 10 inches, and pin around the edges.
11. Pin the two pillow straps about 11/2-2 inches from the edge of what will be the top side of the pillow. Line up the cut end of the strap with the cut edge of the pillow.
12. Straight stitch around the pillow using a 5/8-inch seam allowance and leaving about a 5-inch opening at the bottom of the pillow for stuffing.
13. Stuff the pillow with fiberfill until it’s full. Turn the raw edges of the opening inside and pin the pillow closed. Stitch the opening shut.
14. Hold the pillow up to your chair to find your desired hanging height. Trim the straps accordingly, then staple them to the back underside of your chair’s top rung, where you stapled the sling.
15. Get loungin’!