How to DIY a Beautiful Console
Turn old kitchen cabinets into a chic new console with the help of some simple materials and a fresh coat of paint.
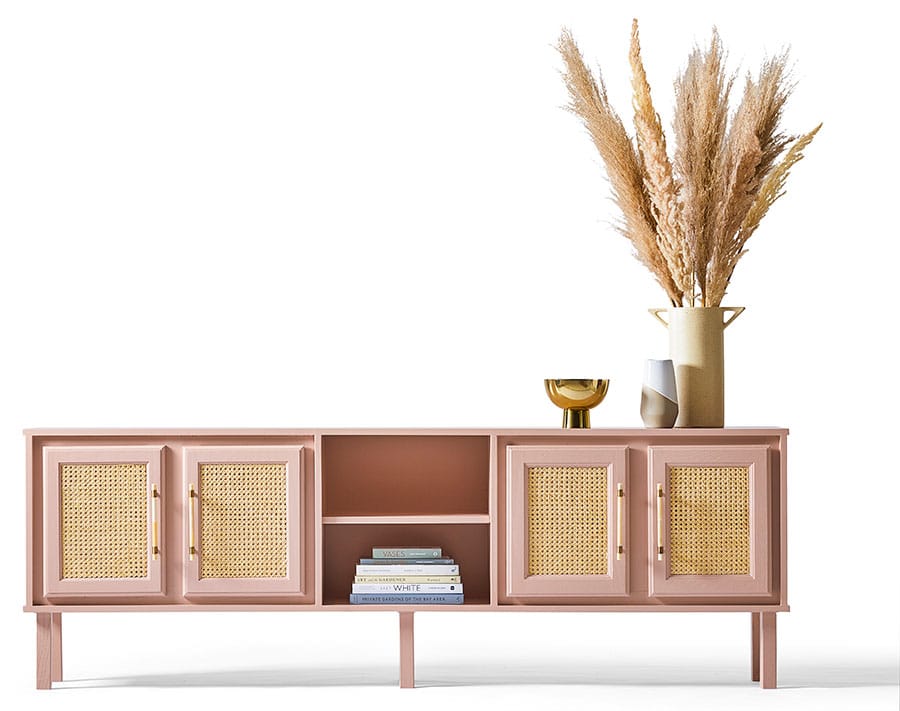
The new issue of Reveal features a gorgeous console made from old kitchen cabinets. It looks fancy, but you can DIY it pretty easily!
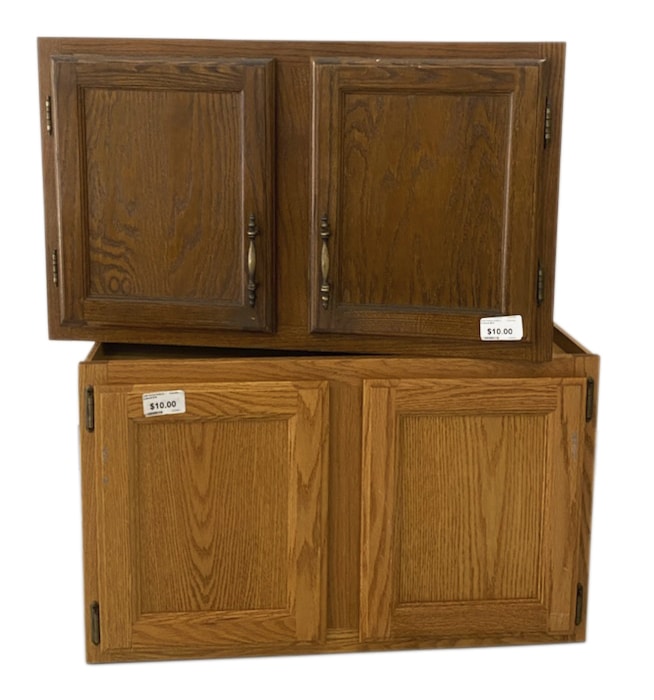
Head to your local thrift store (or garage, if you’ve renovated recently!) for old cabinets, pick your favorite paint color, and get ready to retrofit a pretty new piece of furniture by your very own self!
To help you with the transformation, here’s a full list of tools and resources you’ll need, and a step-by-step DIY tutorial.
One thing to note: our measurements below for the cut list are based on the cabinet size we used (30″ x 18″ x 12″). This size is fairly standard, so the cabinets you would most likely be able to find will be around the same dimensions, but if you can’t, adjust your cuts accordingly! (FYI: 12” is a standard depth; 30”, 36”, and 42” are standard heights; and most cabinets come in widths in increments of 3”).
Ready to get started?
What you need:
- 2 salvaged kitchen cabinets (ours were 30″ x 18″ x 12″)
- 1/2-inch piece MDF wood, for back board
- 1/4-inch piece plywood, for space and filler pieces
- 8 1/2-inch overlay European-style hinges
- Semigloss paint and primer (we used Sherwin-Williams Sashay Sand)
- Paint brush
- Paint roller
- Nail gun and nails
- Wood glue
- Table saw or circular saw with a guide
- Drill with Forstner bit and screw bit
- Tape measure
- Pencil
- Carpenter square
- Caning material
- Contact spray adhesive
- Scissors
- 6 furniture leg plates
- 6 wooden furniture legs (there are tons of color, material and shape options available, so you can fully customize your console)
- Wood clamps
- 4 cabinet pulls (we used these)
Cut List
- 1 shelf: 18″ x 12″ x 3/4″
- 2 top and bottom: 81-1/2″ x 13-1/4″ x 3/4″
- 1 back: 79-1/2″ x 18″ x 1/2″
- 2 outside vertical ends: 18″ x 13-1/4″ x 3/4″
- 2 inside vertical ends (attached to shelf): 18″ x 12-3/4″ x 3/4″
- 4 filler pieces: 1/4″ x 11-1/4″ x 18″ (to make cabinet ends flush with face frames)
Instructions
- Remove cabinet doors and hardware.
- Make all wood cuts—see cut list above for specific measurements.
- Glue and nail filler pieces on each end of the cabinets.
- Lay both cabinets face down and apply wood glue to the back side of each. Lay the 1/2-inch piece of MDF wood on top of the back of the cabinets, with both cabinets set at either end of the back board.
- Nail the back to the back sides of the two cabinets.
- Flip the cabinets over so they’re lying on the back board. Glue and nail each outside end piece of the back board to the outsides of the cabinets. Then glue and nail the top and bottom pieces of the top and bottoms of the cabinets.
- Mark the halfway point on each of the inside end pieces. Line up the shelf piece at the halfway marks, glue, and clamp in place. (This will look like a letter “H.”) Nail the shelf in place.
- Apply glue to the inside ends of the cabinets and slide the shelf piece in between the two cabinets. Nail the shelf in place.
- Sand, prime, and paint the unit, doors, and legs. Allow to dry.
- Screw 4 of the leg plates 1 1/4-inch in from each corner of the cabinet on the bottom side. Screw the remaining two centered and 1 1/4-inch in from the front and back edge of the bottom of the cabinet.
- Use a Forstner bit to drill holes for the European hinges 1/8-inch from the edge of the cabinet doors and 2 inches from the top and bottom. Repeat this for each door.
- Measure the size of the inset panel of the cabinet doors and cut the caning material to size using scissors. Spray contact adhesive to coat the back side of the caning material and lay it onto the recessed panel. Press the caning into place and use your finger to dab up any extra adhesive that might show in the caning holes.
- Measure each door for centered placement of cabinet pulls. Drill holes and screw the pulls in.
- Drill pilot holes into the console doors for hinges, then screw hinges in.
- Drill pilot holes into the face frames on the cabinets. Center the doors vertically in the cabinet openings and screw the hinges into the face frames.
By Hannah Baker | DIY Design by Jeni Wright | Photograph by Carson Downing